Take a Tour of Daylite
Daylite is a highly customizable application with a wide range of capabilities to make it easy for you to simplify your work life so your small business runs smoother. With centralized management of all its capabilities, Daylite helps to keep you productive, organized and focused.
This tour of Daylite will give you a basic overview of the application, and how to navigate through the different screens to find the information you need quickly and efficiently.
When you open Daylite for the very first time, you are presented with a blank slate. So where do you begin?
Why, at the beginning of course.
The Home Screen
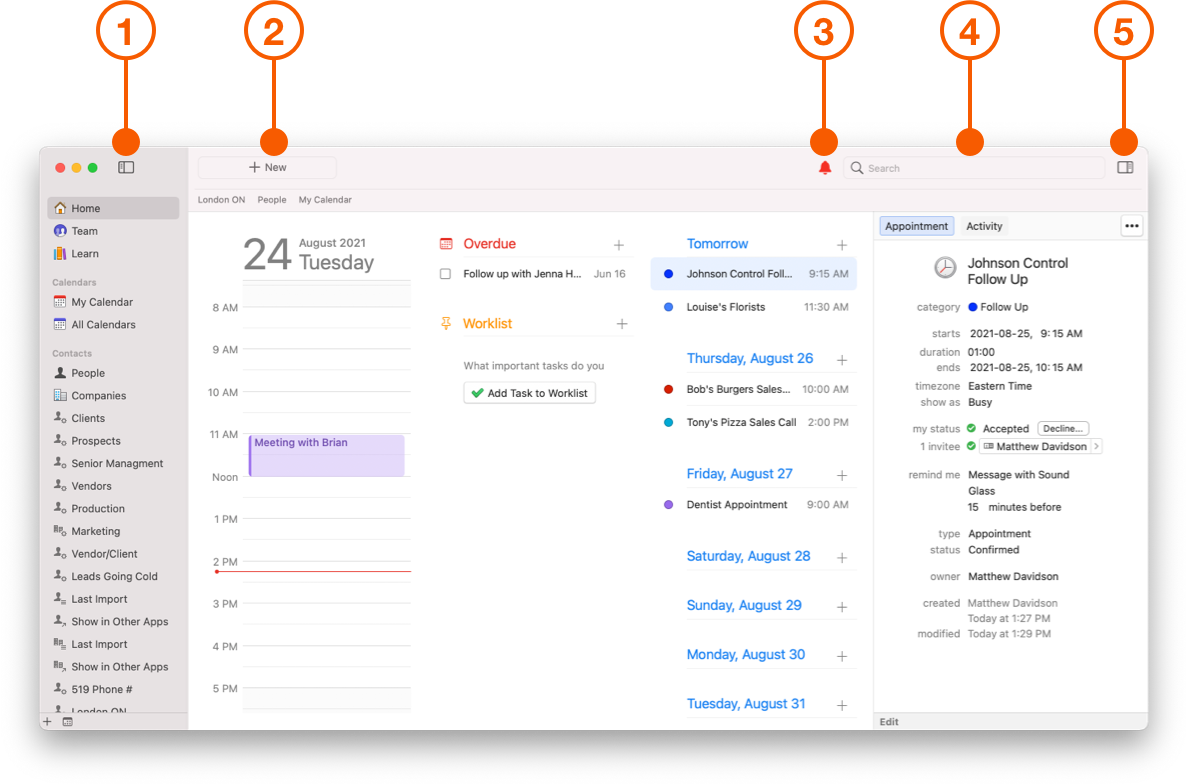
Let's start with the your Home Screen. This view is designed to help keep your day organized, and shows you everything you have planned for the day at a single glance. This dashboard view gives you a detailed view of your work day, task list, and your upcoming work week.
At the top of your Home Screen you will find:
Sidebar Button: Show or hide your sidebar with a single click.
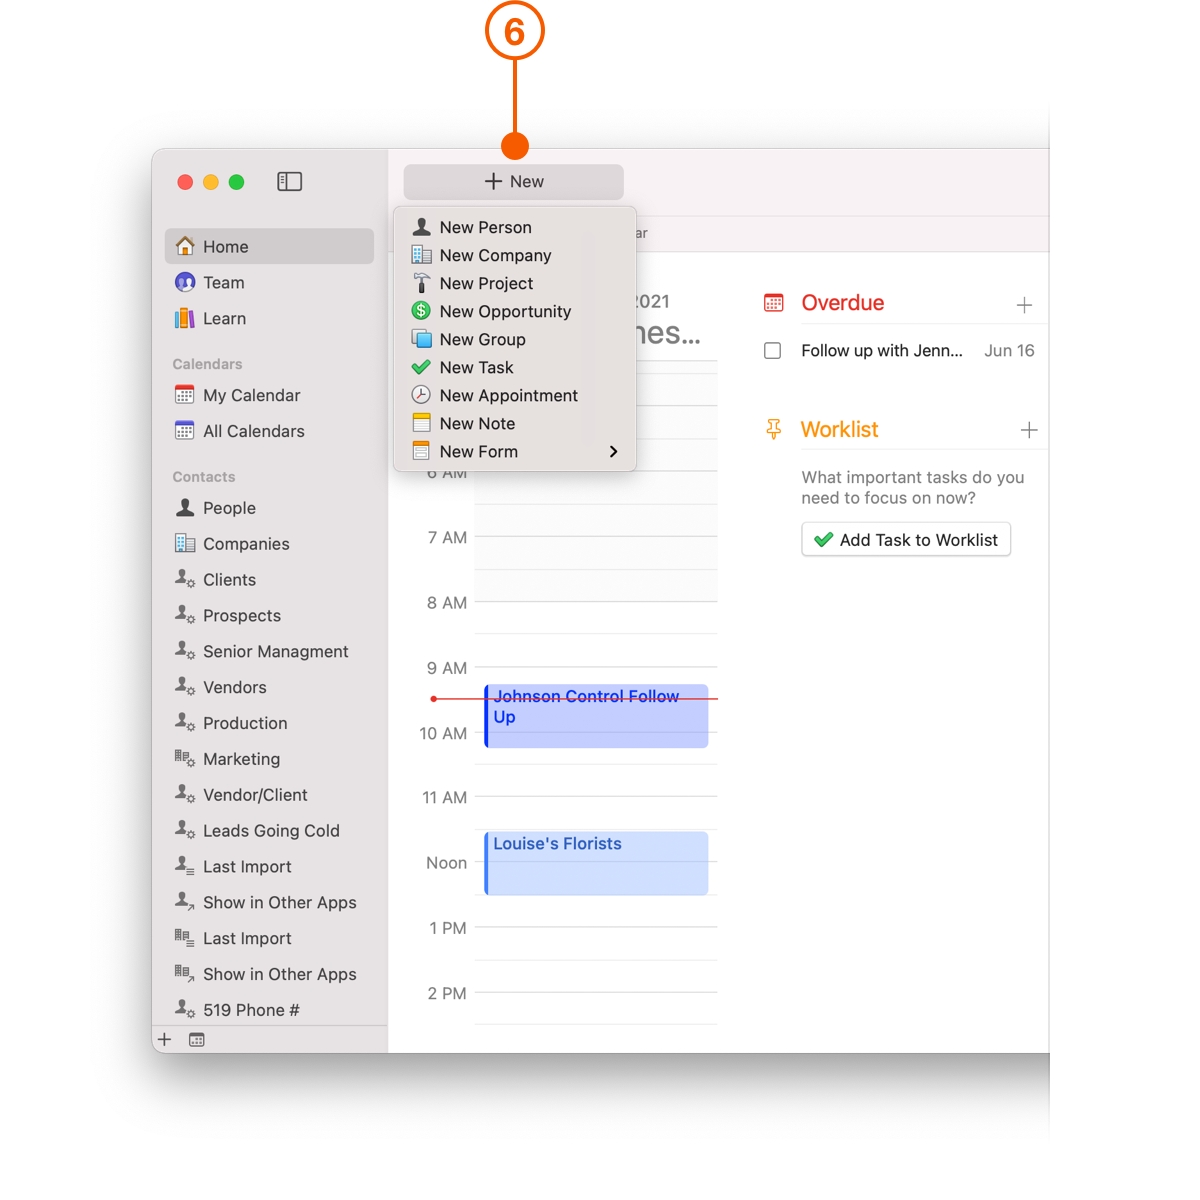
New Object Button: Create new objects from one convenient location.
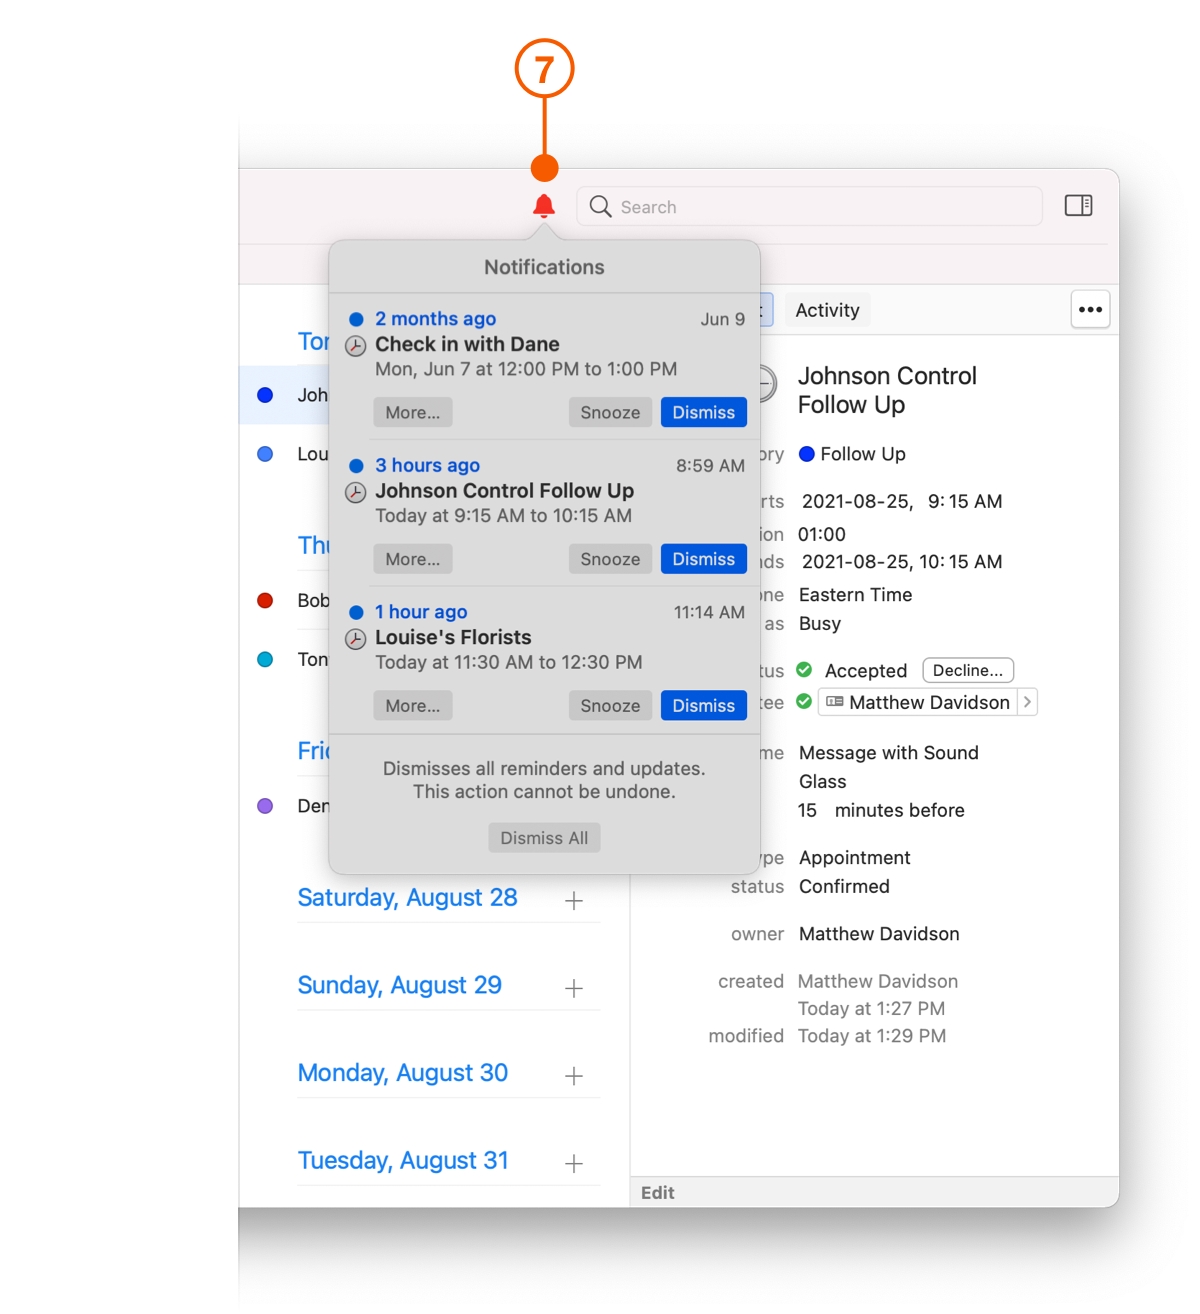
Notification Button: Shows alerts and reminders.
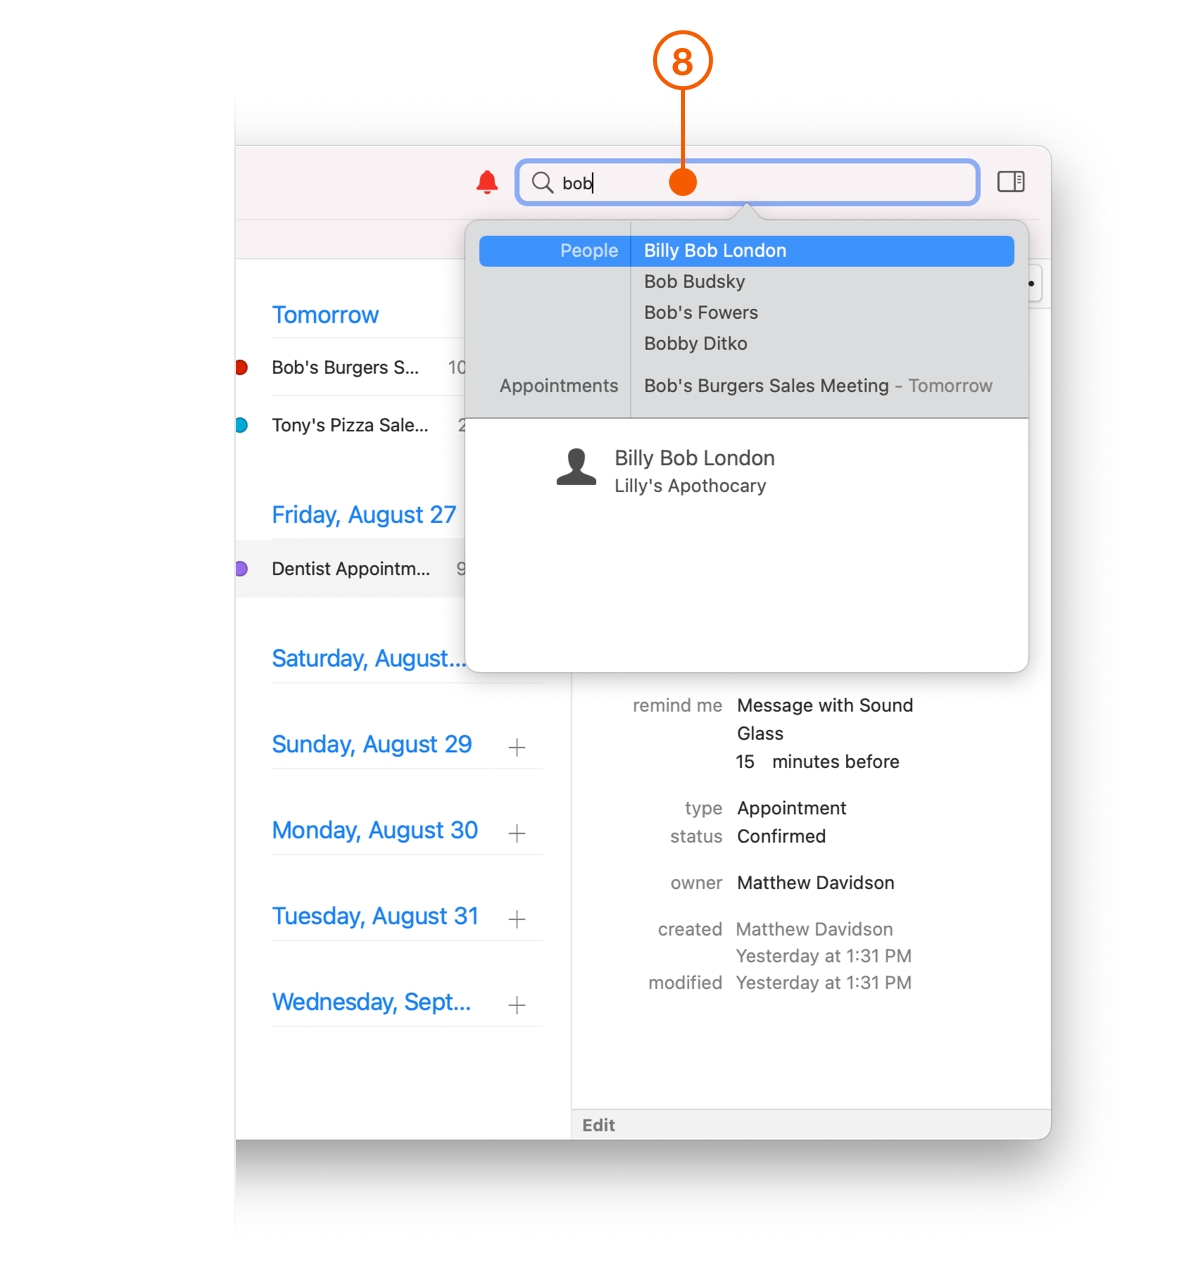
Quick Search: Find what you are looking for FAST.
Details View: Shows details about the selected item.
By clicking on the New Object Button, you can create new contacts, projects, tasks etc. You can edit this information at any time, adding to each entry as you need to.
Notifications and alerts are shown when you click on the notification button.
Quick Search lets you quickly find what you are looking for, searching all of Daylite for any mention of what you type.
Calendars
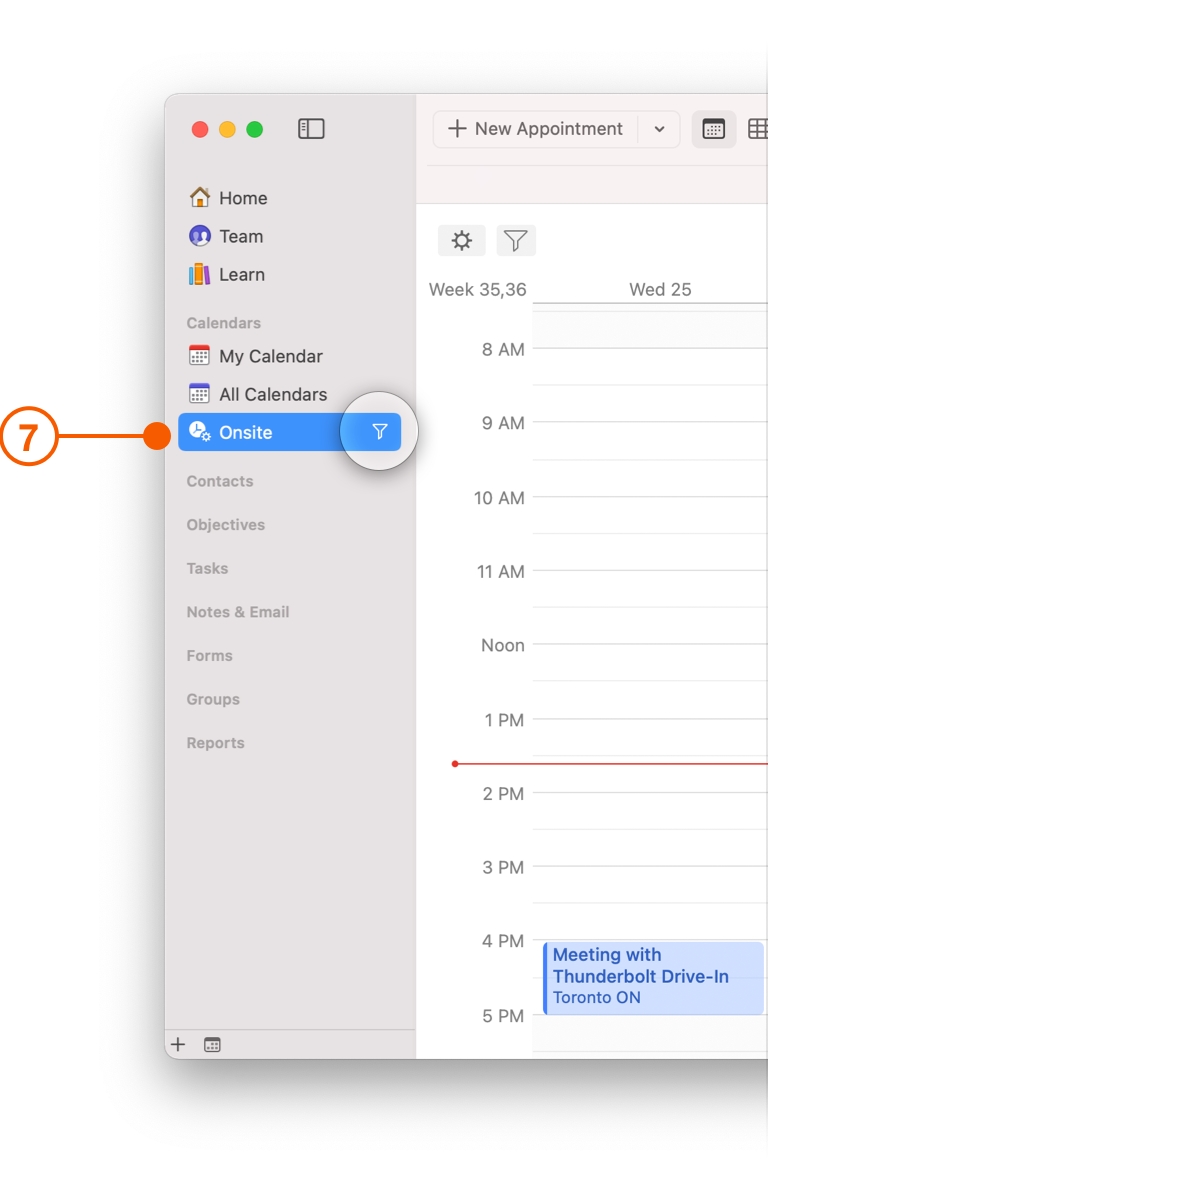
Under the Calendars section in the Sidebar, you will find two different calendars. The first is your own, called My Calendar.
The second is called All Calendars. This is the team calendar, which lets you view, create, and edit calendars between your team.
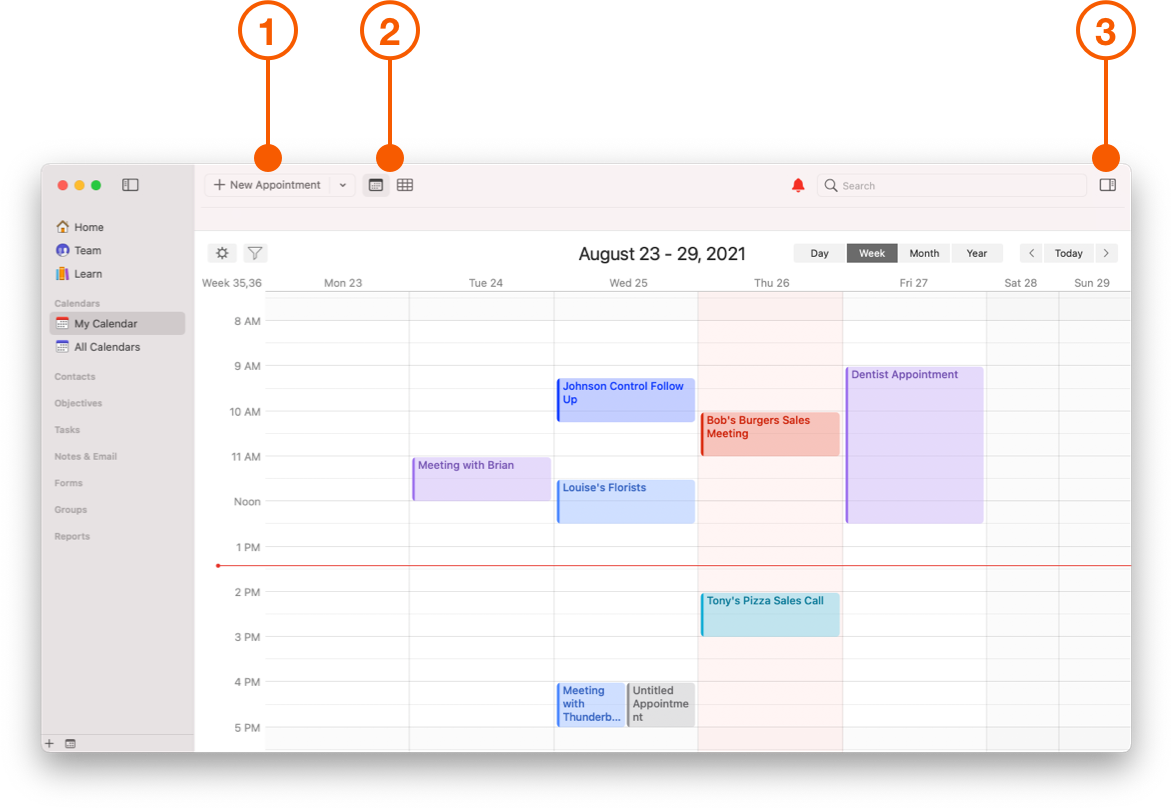
When you select either of the calendars in the Sidebar, you will immediately notice that the controls along the top change slightly.
The New Object button now says New Appointment, which reflects the Calendars view you are in.
You now have a choice of between Calendar View and Multi-Column List View.
The Details View changes to reflect the appointment selected.
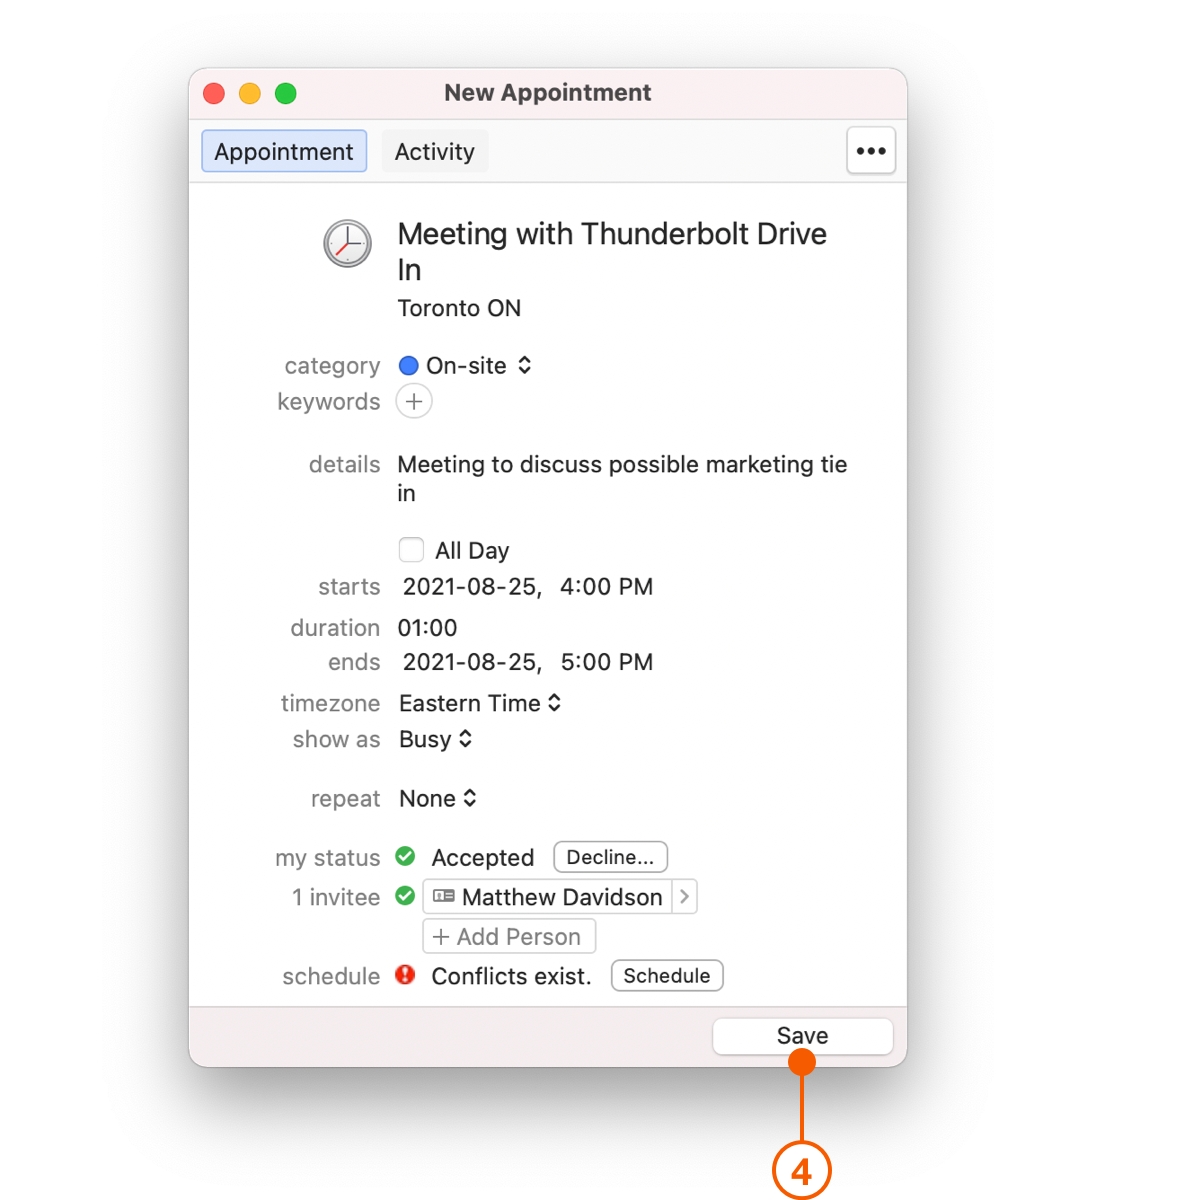
You can create a New Appointment by clicking on New Appointment in the Toolbar. Add a Title, Category and Keywords. You can also add Details, a Start and End Time, and link the appointment to an Activity such as a Task or Agenda. Be sure to click Save.
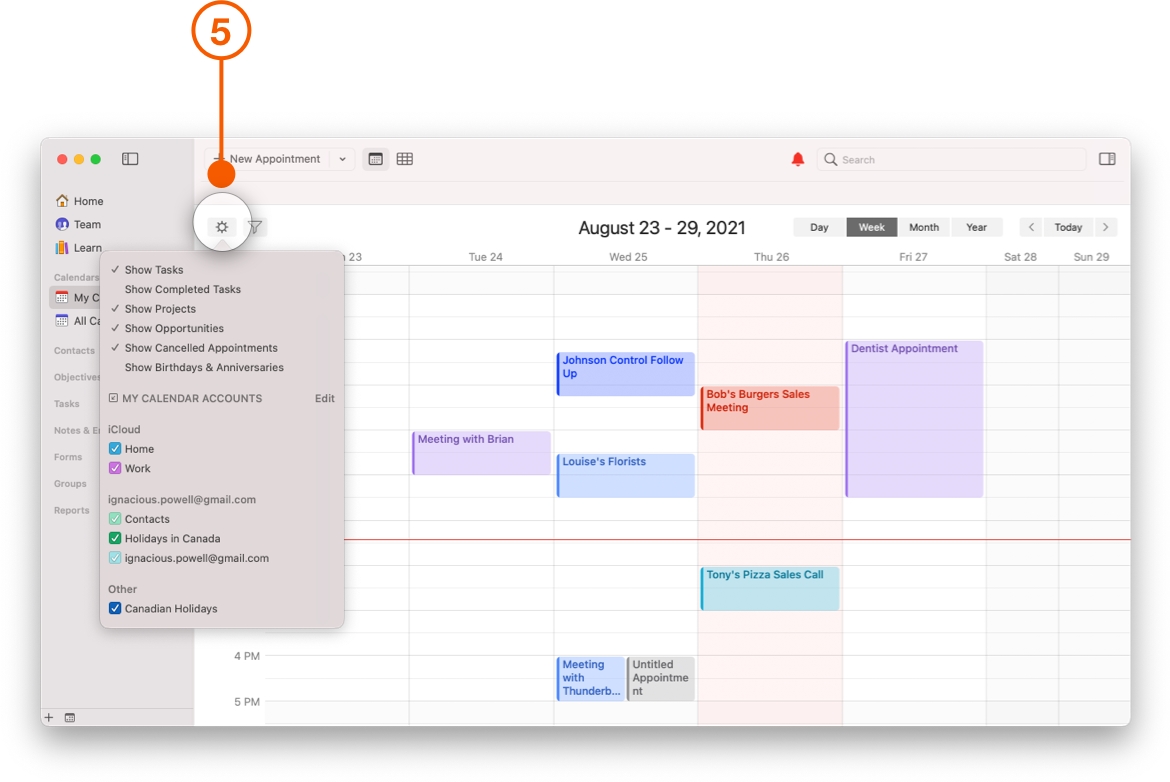
Click the Action button on the left hand side of the Calendar to access display options. From here you can Show Tasks, Show Projects, Show Opportunities, and more.
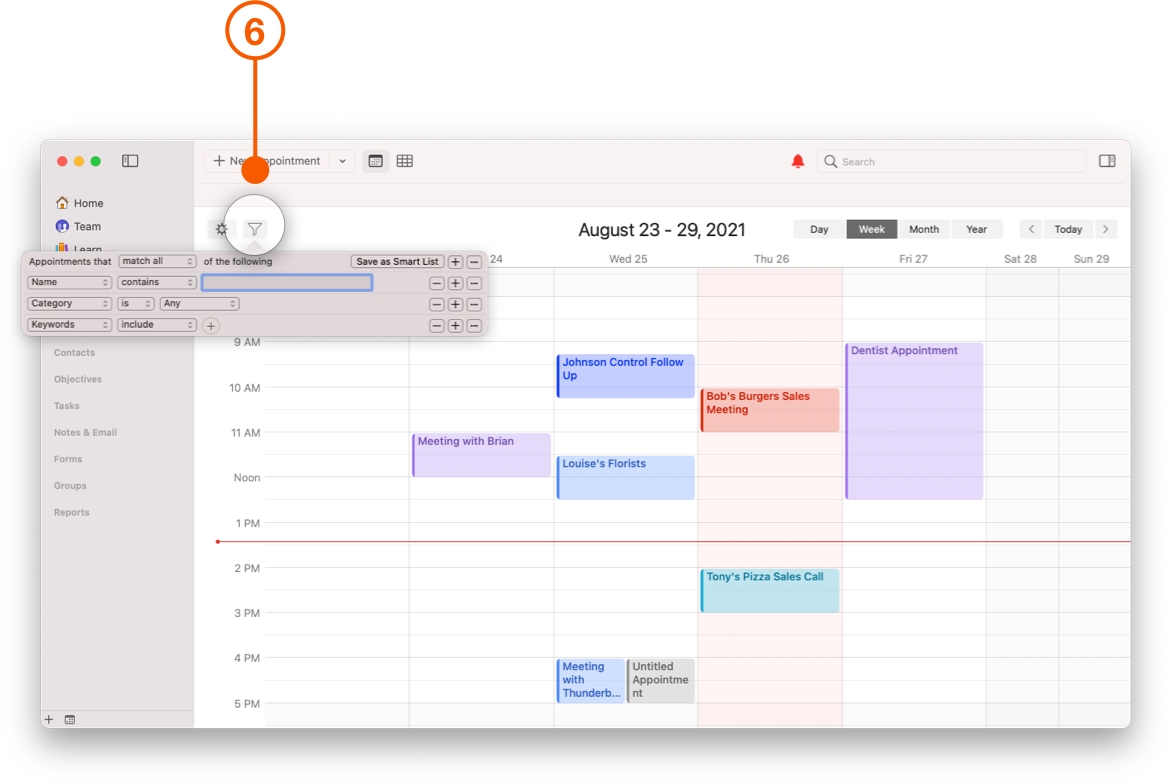
Selecting the Filter button presents you with options to filter based on fields like category, keyword, name, or more. You can save a filter as a Smart List so that you can easily view it again later.
These Smart Lists are saved in the Sidebar.
Contacts
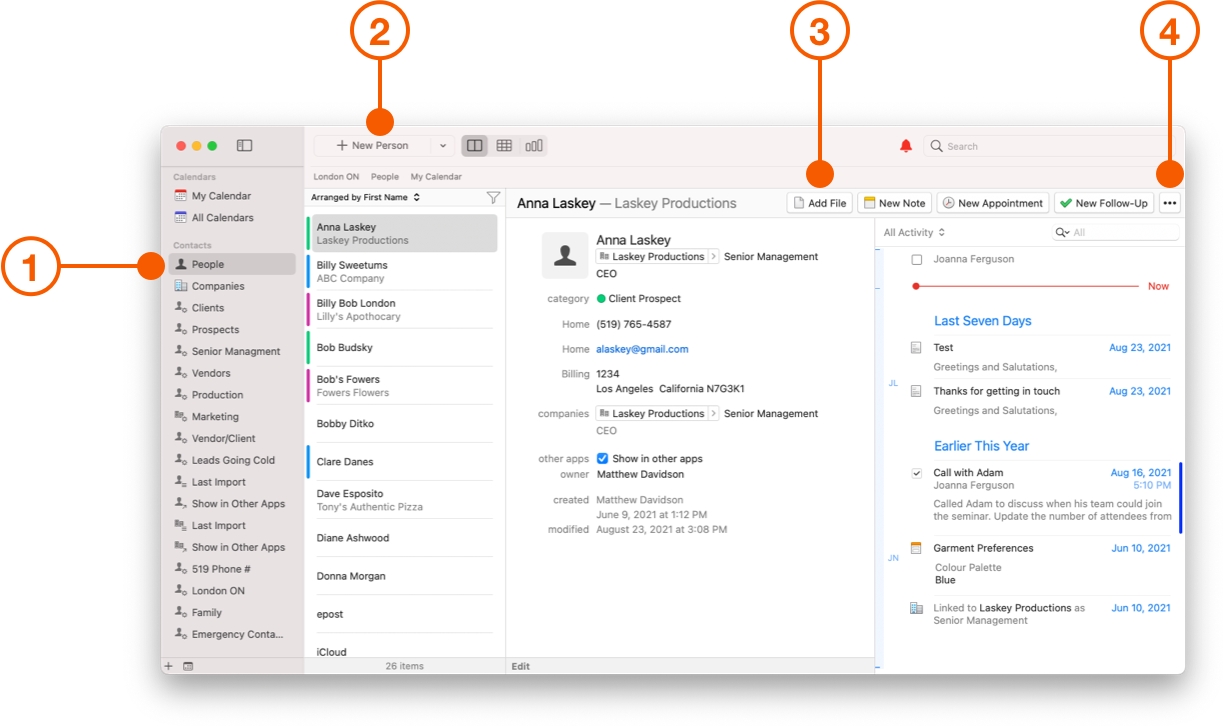
Moving down to Contacts on the left hand sidebar, you will see People and Companies by default. The other lists in this example are all Smart Lists that you can create at any time.
The New Object button now says New Person, which reflects the Contacts view you are in.
You can select Add File, New Note, New Appointment, New Follow-Up, or click the ••• button to view even more options.
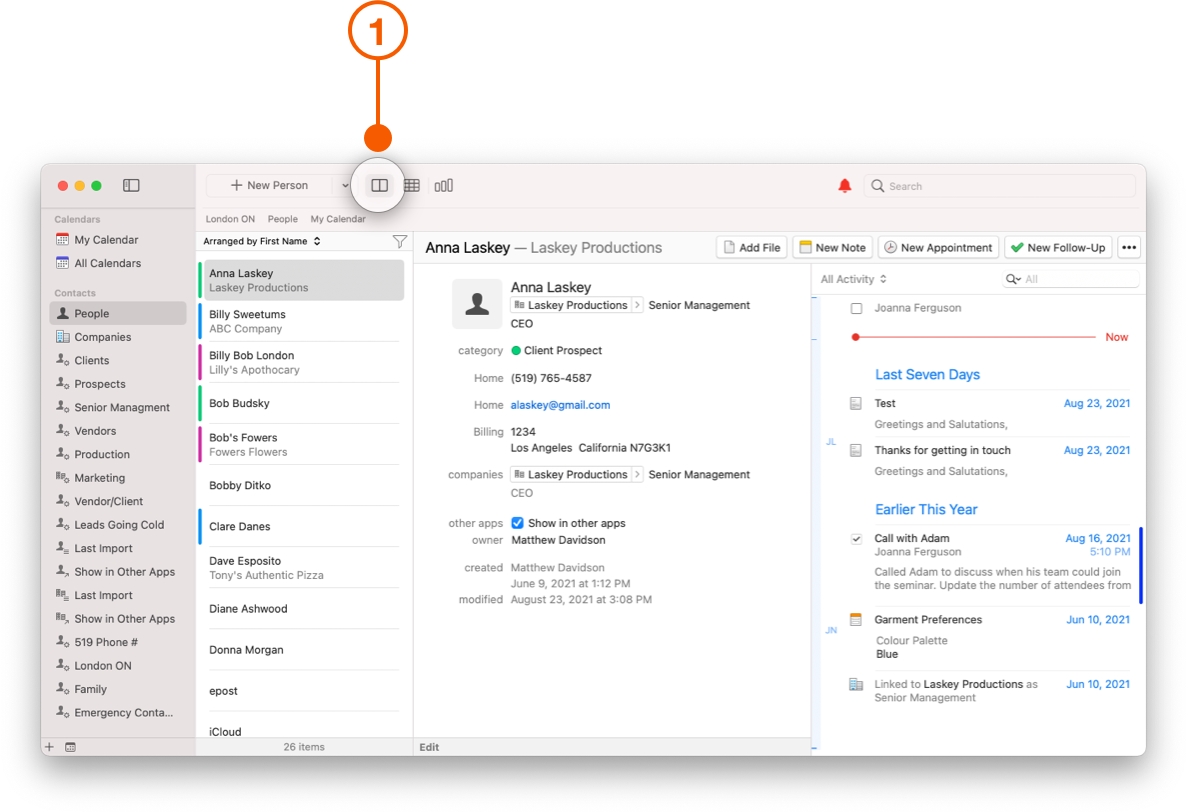
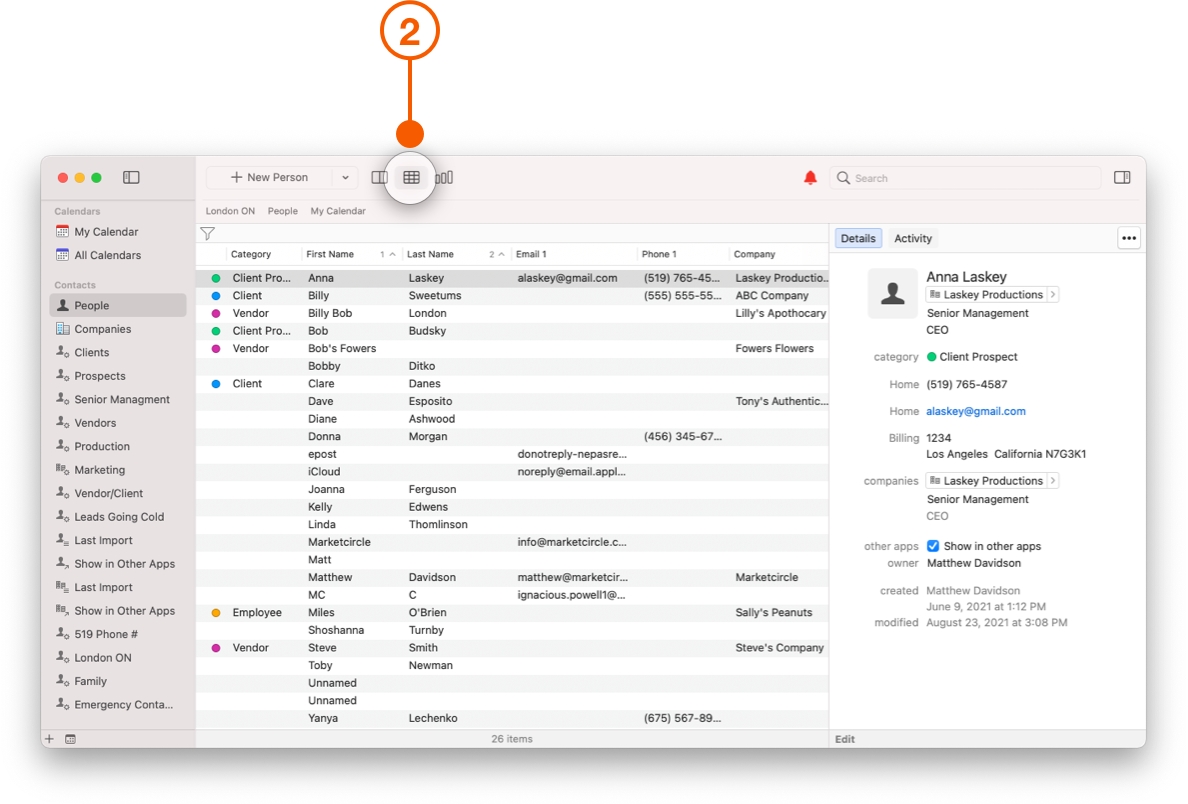
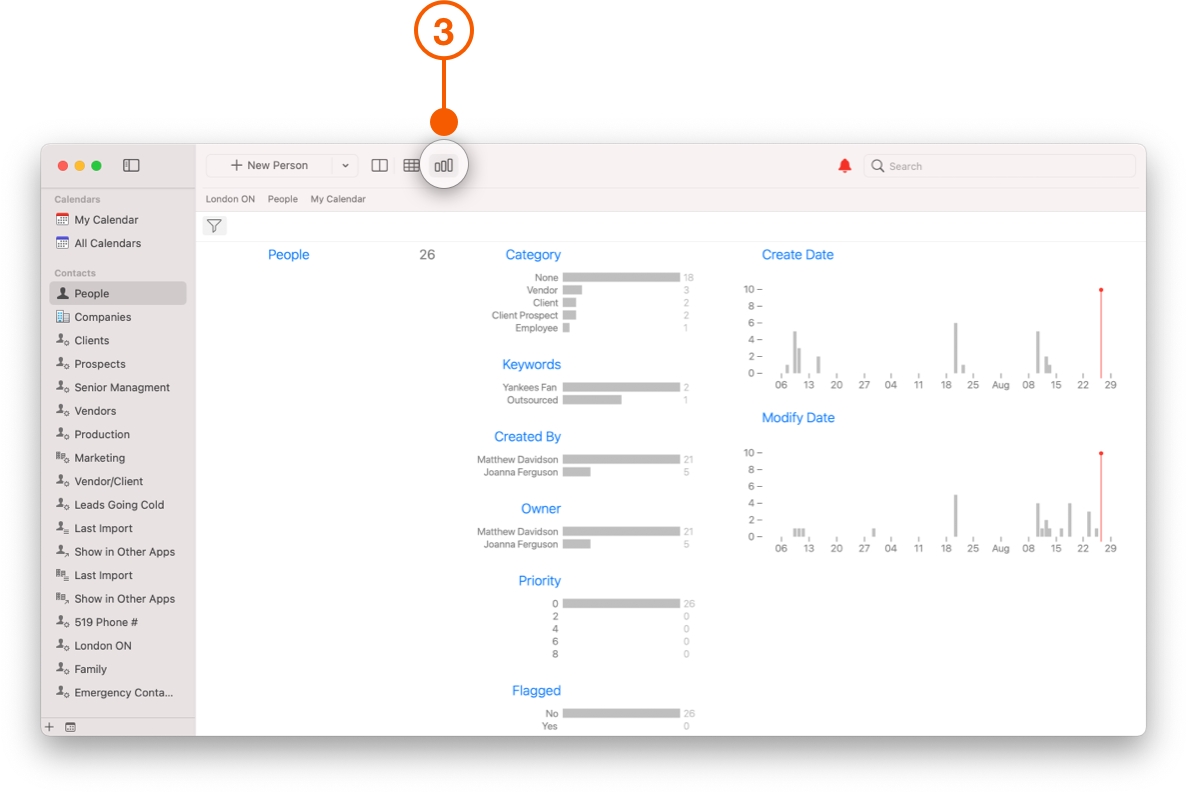
There are three different ways to look at the Contacts view.
List View
Multi-Column List View
Insight View
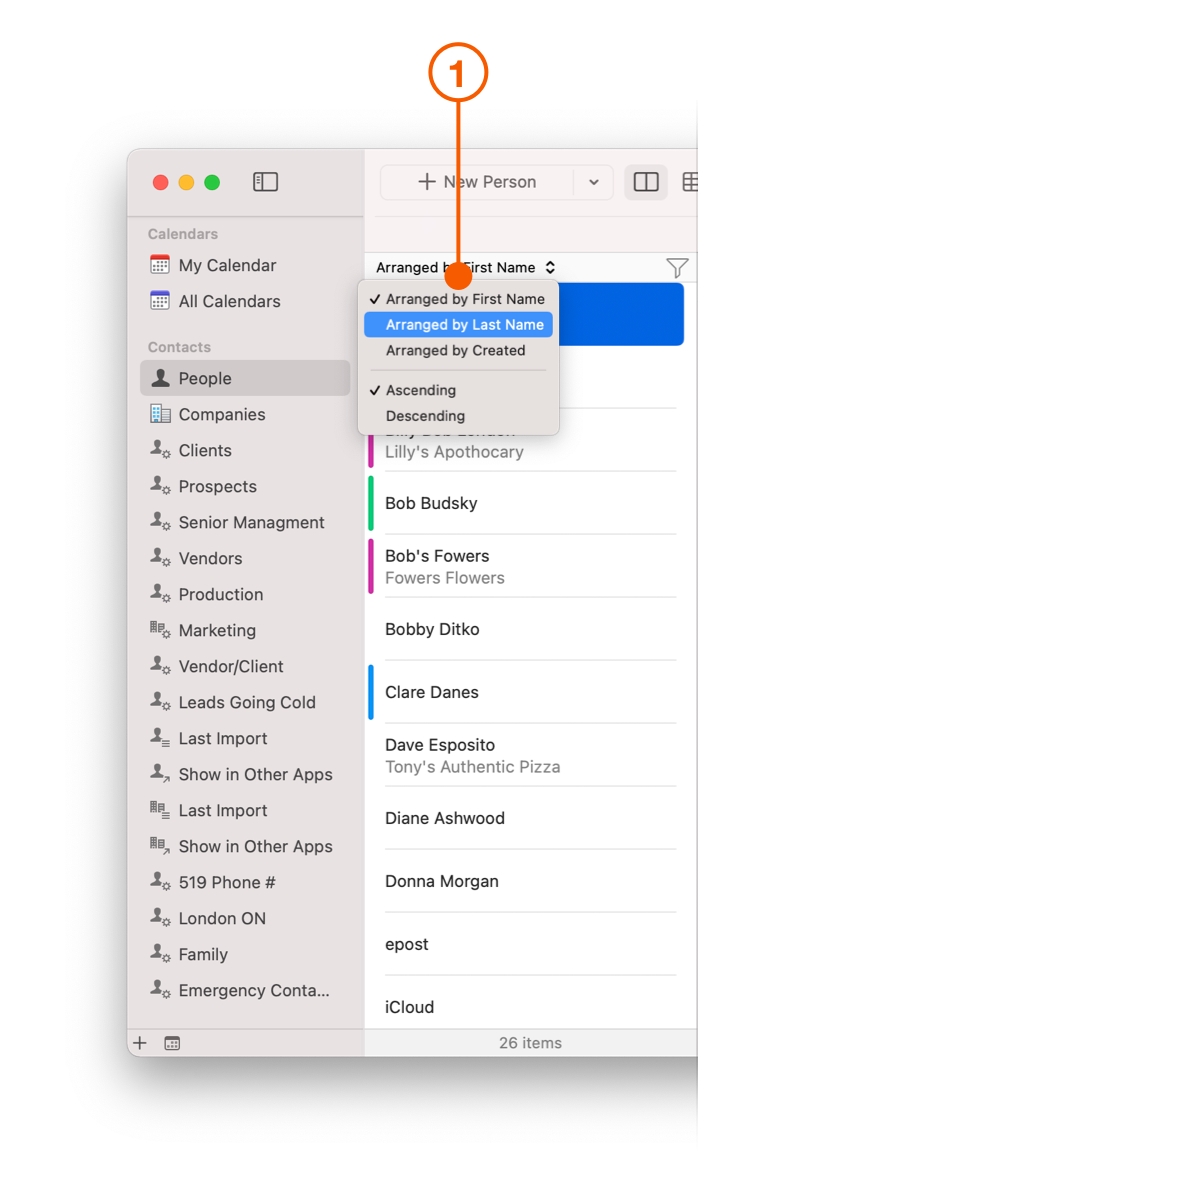
Filtering options are located in the same place, and include Arranged by First Name, Arranged by Last Name, Arranged By Created, Ascending and Descending order.
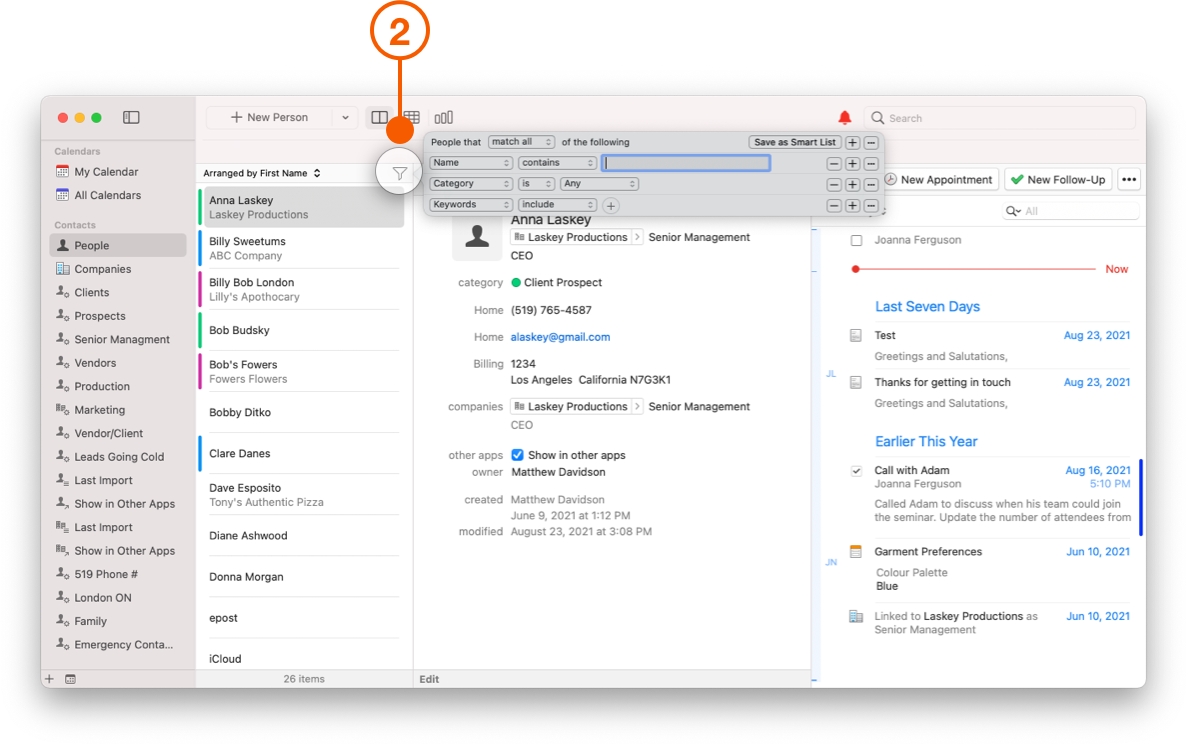
The Filter button is also located in the same place, allowing you to create Smart Lists that help group your contacts according to specific criteria.
Objectives
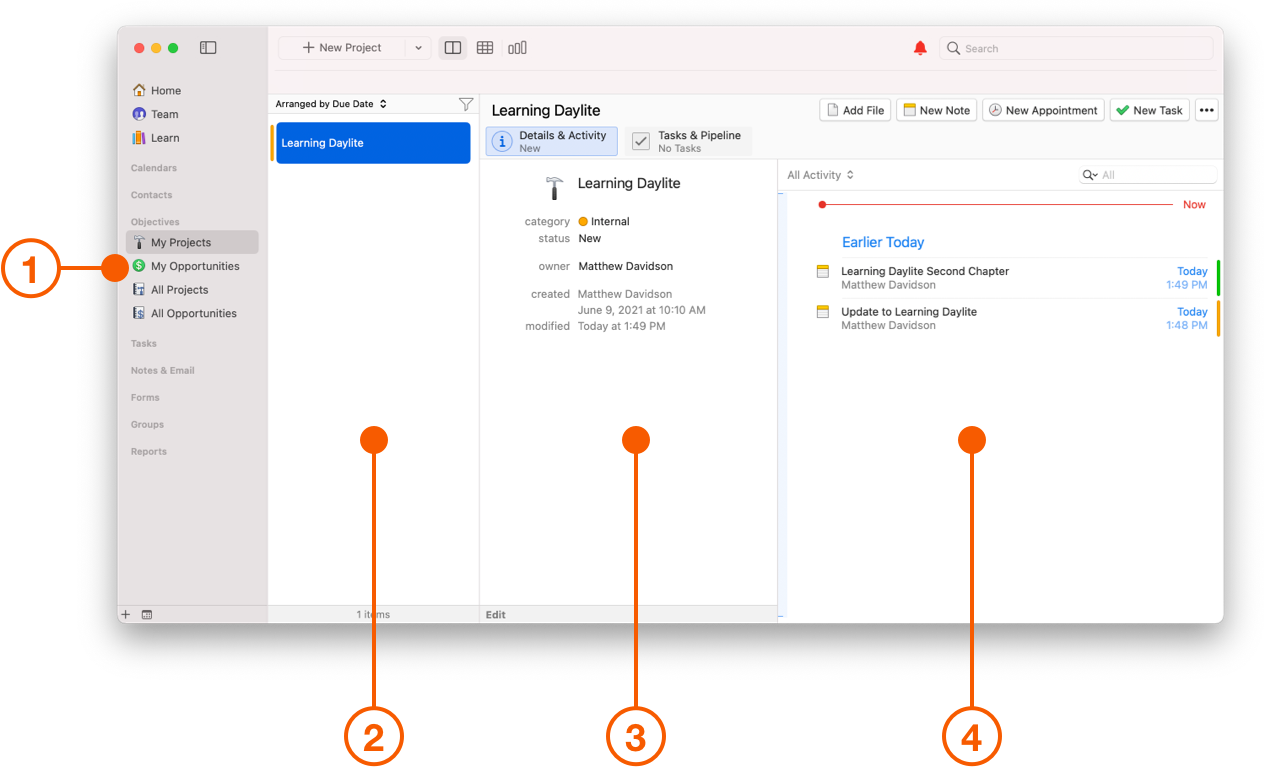
Under the Objectives section you will find lists for My Projects, My Objectives, All Projects and All Opportunities. These last two allow you to collaborate with your team on shared projects or opportunities.
As with all other object views, Objectives shares the same general layout with the main list. By selecting an Objective you will see the:
Side Bar
List View
Details View
Activity View
The Activity View shows a timeline with linked history on the right.
Tasks
The Tasks section looks very different than the other sections found in the Sidebar.
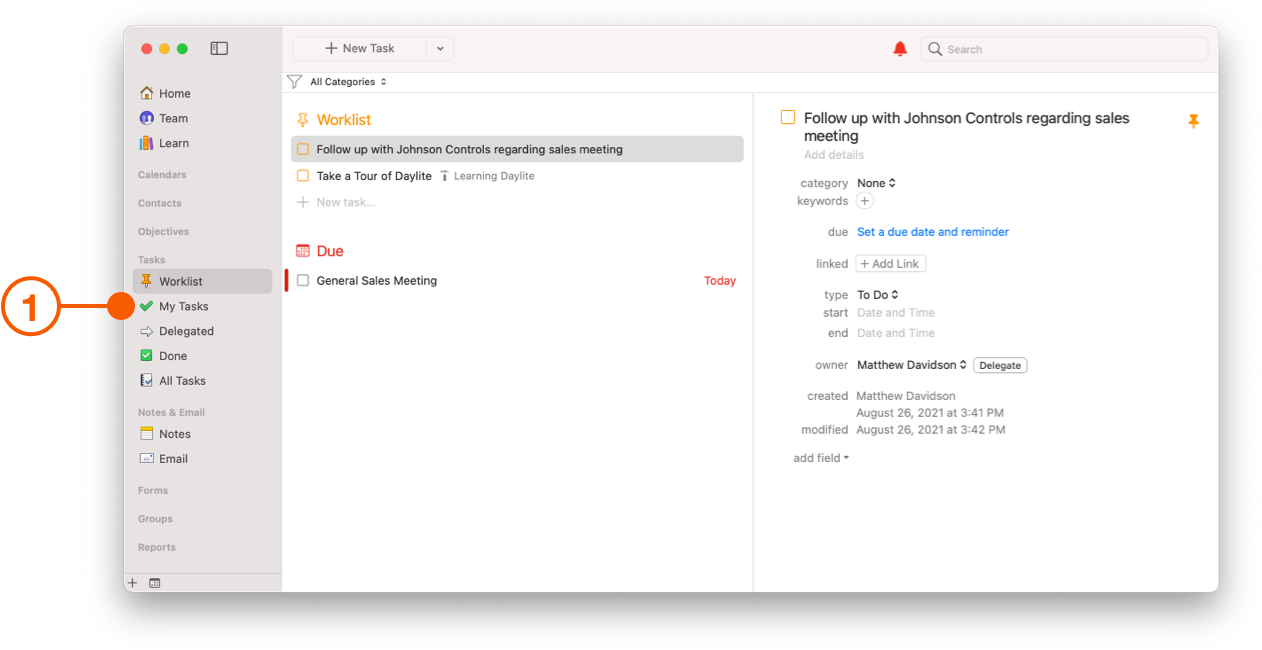
Tasks are grouped into Worklist, My Tasks, Delegated, Done, and All Tasks.
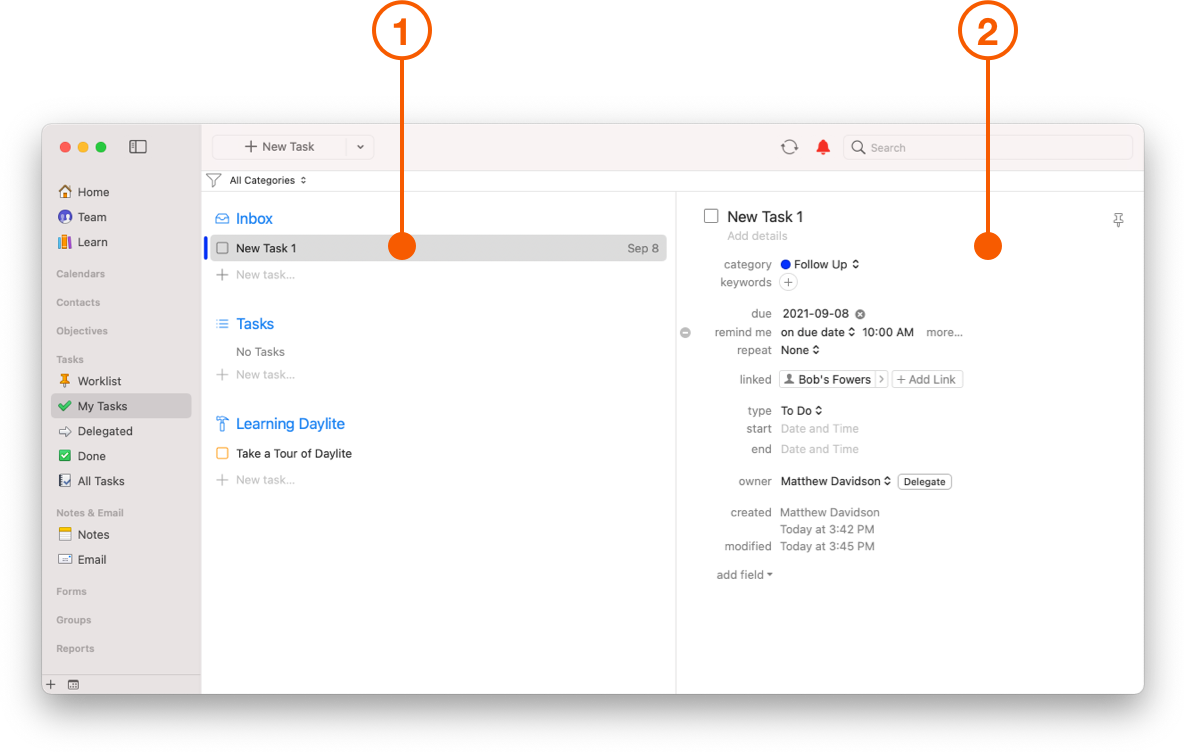
The My Tasks section is divided into different sections. For example, you will find the Inbox, Tasks, and Projects that you are involved in.
Inbox: Quickly get tasks off of your mind by adding them to your Inbox until you have time to categorize them later.
Tasks: See the tasks you need to remember to complete.
Projects: See the next actions you need to take on each of the Projects you are involved in.
Here are some examples of how to use Tasks.
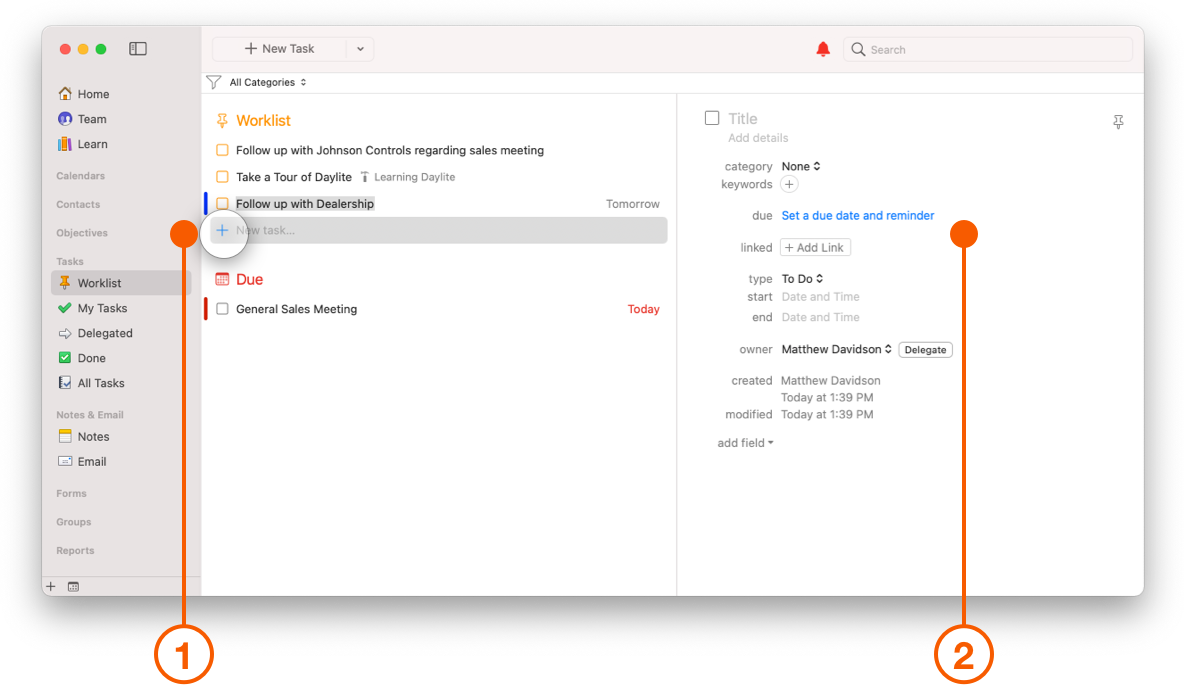
You can create a Task.
Fill in the Task Details.
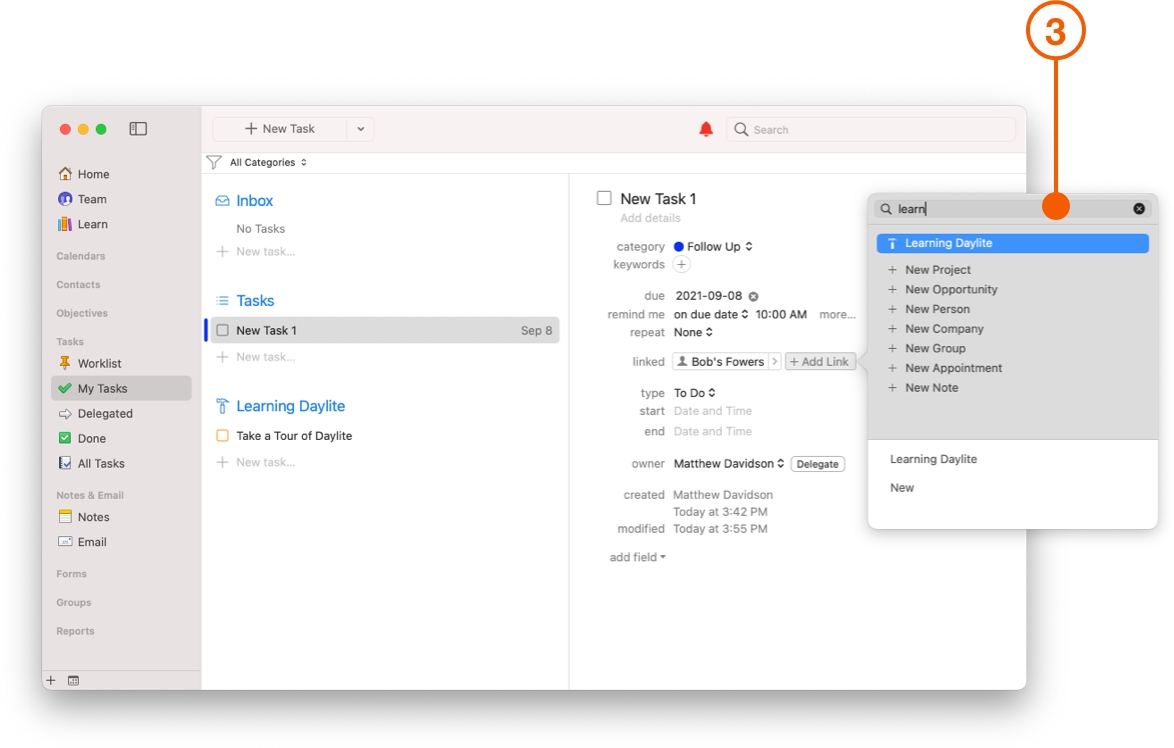
You can link the Task to an existing Project.
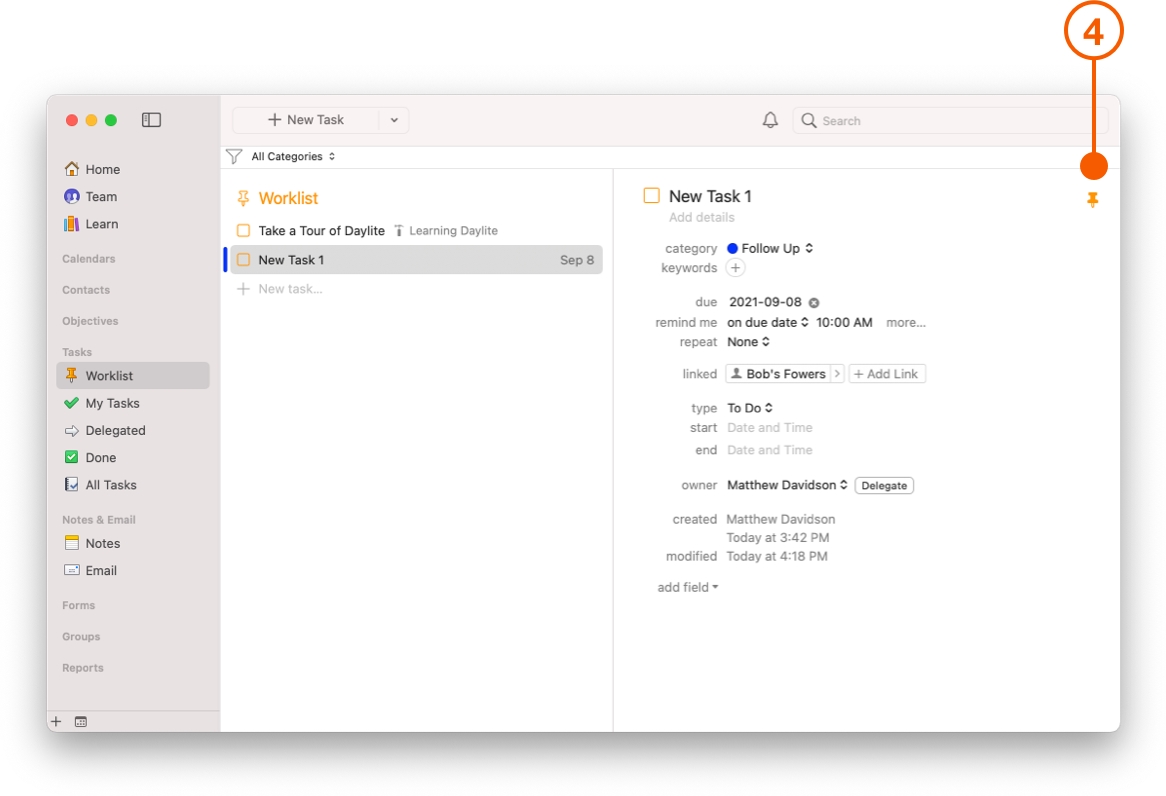
Clicking on the pin icon moves the Task into the Worklist section.
The Worklist section is designed to help you focus on what needs to be done right away. It helps to think of it as your "priority" list.
Any due or overdue tasks will also be brought to your attention under the Due section.
A new Task can be created by clicking the + New Task button.
Fill in the Task Details.
Tasks can also be added to the Worklist from anywhere by dragging the Task onto the Worklist in the Sidebar.
Notes and Email
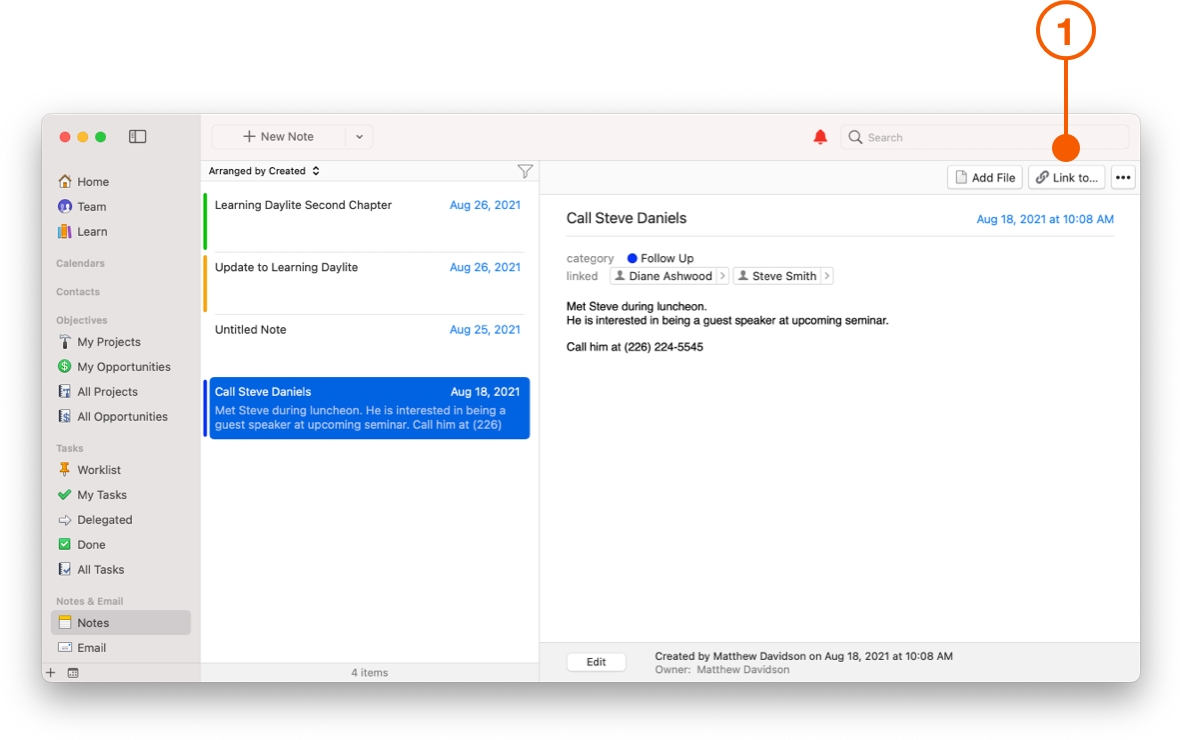
Use Notes to capture details during a call or meeting, or add details to a Task or Objective.
Link the Note to a Contact, appointment, or any other item in Daylite, and it will be added to that item's Activity view.
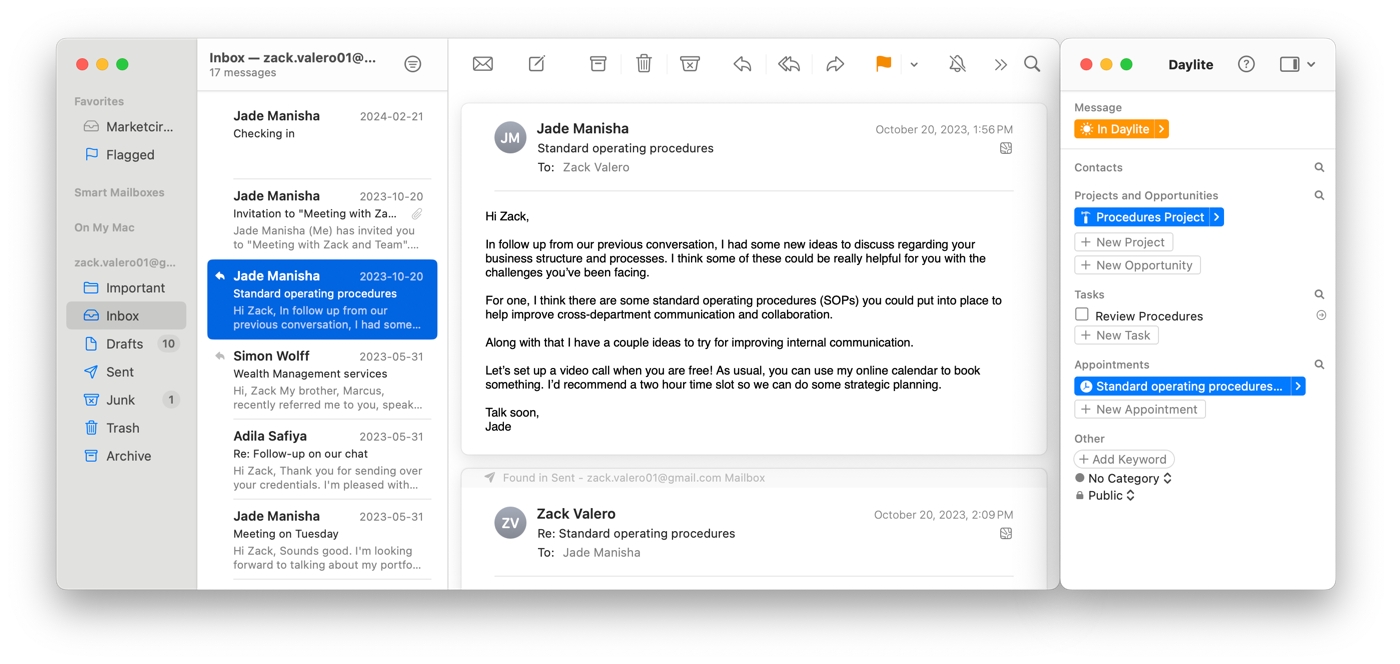
Daylite includes the Daylite Mail Assistant window, an extension for the Mail app on Mac. The Daylite Mail Assistant window allows you to capture new and existing Contact's information straight from your inbox, while also linking them to the email directly within the Mail app. Switching between apps can sometimes be disruptive to your workflow, so this feature gives you a major productivity gain.
Wrap Up
Daylite can help you organize your day, your business, and your life. Thanks to its intuitive structure, you can add that important person to Contacts, check when your next appointment is coming up in Calendars, and create Tasks and Notes so you never forget an important point during a call or meeting. All of these features, and more, tie together to guarantee your business runs smoothly.
For more information on how to set up the Daylite Mail Assistant, please refer to Install and log into Daylite on the Mac.
For more information on how to capture a Contact from an email, please refer to Capturing A Contact From Email.
Last updated
